Fairing by Machine
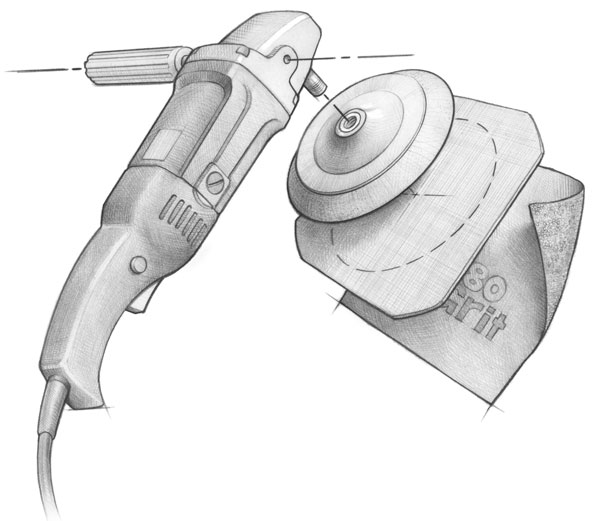
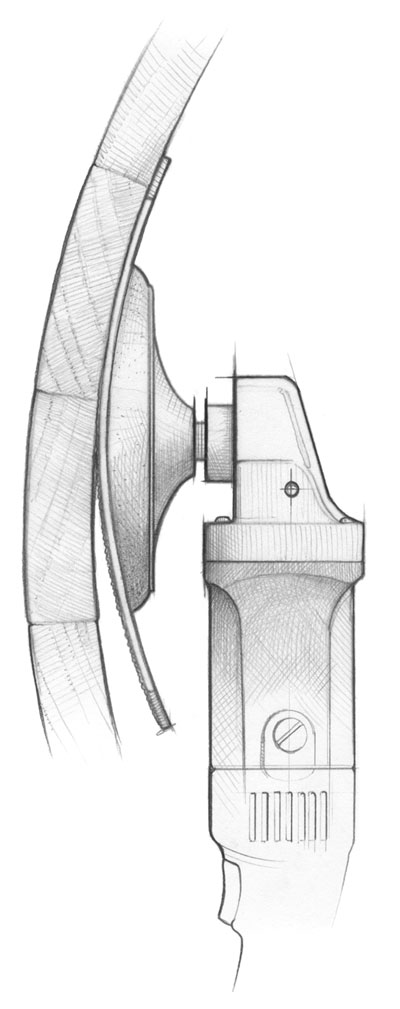
A flexible fiberglass backing glued to a grinder’s foam pad is all that’s needed to convert the tool into an efficient fairing device.
A retrofitted grinder eases this arduous task
by Damian McLaughlin
Illustrations by Robert LaPointe
Most boatbuilders have little tricks that make a job go faster or better. Fairing a 40′ hull is an arduous task often accomplished by two-man teams wielding fairing boards—which, appropriately, are often called “torture boards.”
In my shop, we do 90 percent of the work of fairing with a grinding device, saving the torture boards for a final pass and for hard-to-reach areas. A grinder removes a substantial amount of material, quickly. The trick is in controlling that removal. We use a common, heavy-duty 0–6,000-rpm sander-polisher retrofitted with a shop-made pad. The pad is a 9″x11″ rectangular piece of fiberglass or Lexan glued to a standard round foam backing pad. Using this setup, we find it is virtually impossible to ding the surface being faired.
I didn’t invent this device, but I have done a fair amount to optimize its effectiveness. The rectangular pads are used for fairing both convex and concave surfaces. For convex surfaces we mount a sheet of fiberglass about 0.095″ thick onto a very stiff foam pad. The fiberglass sheet is commercially available, but the best approach is to make it in the shop; the off-the-shelf material is a bit more dense and therefore heavier than preferred. To create your own, lay them up on a pane of glass placed on a perfectly flat surface. Standard mold-release wax assures removal of the finished piece from the glass. I use three layers of double-bias 12-oz non-woven fiberglass sandwiched between single layers of 6-oz woven cloth and unthickened epoxy. I allow the laminate to sit for several days to ensure that the cure is complete. If you don’t want to make your own rectangular pads, the fiberglass sheets for them may be purchased from industrial suppliers such as Manhattan Supply Co. (www.mscdirect.com).
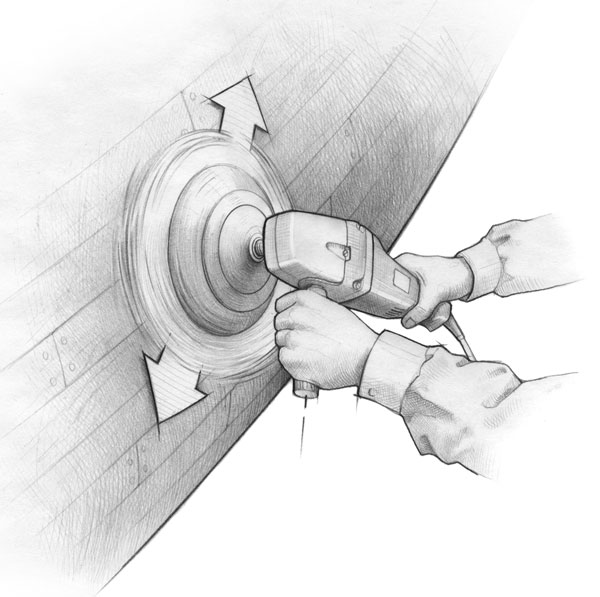
A grinder retrofitted with a fiberglass backing plate removes a lot of material, fast, from convex surfaces. The machine must move diagonally across the surface. It’s a good idea to practice in order to learn the machine’s nuances.
Concave surfaces are addressed with a sheet of 1⁄16″-thick Lexan attached to a very soft pad—a more flexible arrangement than the one previously described. The stiff foam pads we use in my shop are from 3M and are called Stikit disc pads; the part number is 05579. The soft pads for fairing concavities are from Ferro and the part number is 808D.
The rectangular pad is the exact size of a sheet of production paper. Care must be taken to attach the foam disc to the pad’s exact center in order to avoid balance distortions. I carefully locate the center with fine pencil lines crossing the rectangle from opposite corners. Also, I cut the corners of the rectangular pad to a 2″ radius and sand all edges, for safety. Mark the center with a centerpunch; and with pencil dividers make a circle the exact size of the pad’s diameter. This is the glue line. Then make a concentric ring ⅛″ larger than the pad’s diameter. This is the actual reference line, as the epoxy will squeeze out and obscure the first circle you drew. Both surfaces to be glued must first be abraded with coarse sandpaper—except the Ferro pads, which have a cloth layer glued to their surface, which improves adhesion. Use two thin, level coats of epoxy on each gluing surface. Clamp the whole affair together by laying four 1x4 boards across it and weighting them with 4-lb lead weights, or something similar. Make sure the surface under the rectangular pad is flat; otherwise, the pad may become permanently distorted. Likewise, never store the pad on its face with the machine attached to it, for it will be rendered useless from foam distortion.
One must be careful in using this tool—both for the safety of the operator, and for those in the vicinity. Eye protection is a must. The thought of this rectangle zinging around at 3,000 rpm is a bit scary, but in practice and with ample caution you will find it very safe and easy to use. A beginner will figure out its nuances after some practice, but there are some operational tips to help you get started.
A soft foam pad and very flexible sheet of Lexan allow this tool to fair inside curves, too.
First, the optimal speed seems to be about 3,000 rpm. If you’re using a variable-speed machine, slower speeds will help you to gain confidence. Second, constant diagonal movement across the surface is essential. Never move fore-and-aft along a waterline. Third, move your feet 3″ to 4″ for every pair of arm passes; areas that require you to be on your knees or reaching out still require constant motion. Multiple passes, removing small amounts of material on each pass, is the best procedure. As the job progresses, the visual perception of irregularities will disappear. We dust off the hull often and inspect visually and with our hands. Using the flat of a pencil, we mark imperfections. In addition to marking these trouble spots, we also use multiple S-shaped scrawls across the whole surface so we don’t lose track of where we’ve been.
The soft-foam-and-Lexan version (we call it the “Superflex”) has some quirks of its own, as it is used on concave surfaces. Its handling characteristics will become obvious with some practice, but know that heavy pressure will allow contortion of the pad into tight areas and, even with this pressure, the pad will still do a good job of fairing.
I’ve found many uses for these fairing devices over the 35 years I’ve been using them, and I hope this article will similarly ease your work while improving your results. 
Seeking a challenge, Damian McLaughlin left his job as a carpenter and cabinetmaker 40 years ago and began building boats. After 34 custom and over 100 rowing boats and daysailers, he is still enjoying the challenge. His shop is in Falmouth, Massachusetts.