An Eye for Details

Customizing a skin-on-frame dinghy

Text and photographs by Steve McMahon

Platt Monfort–designed Classic 10 skin-on-frame dinghy


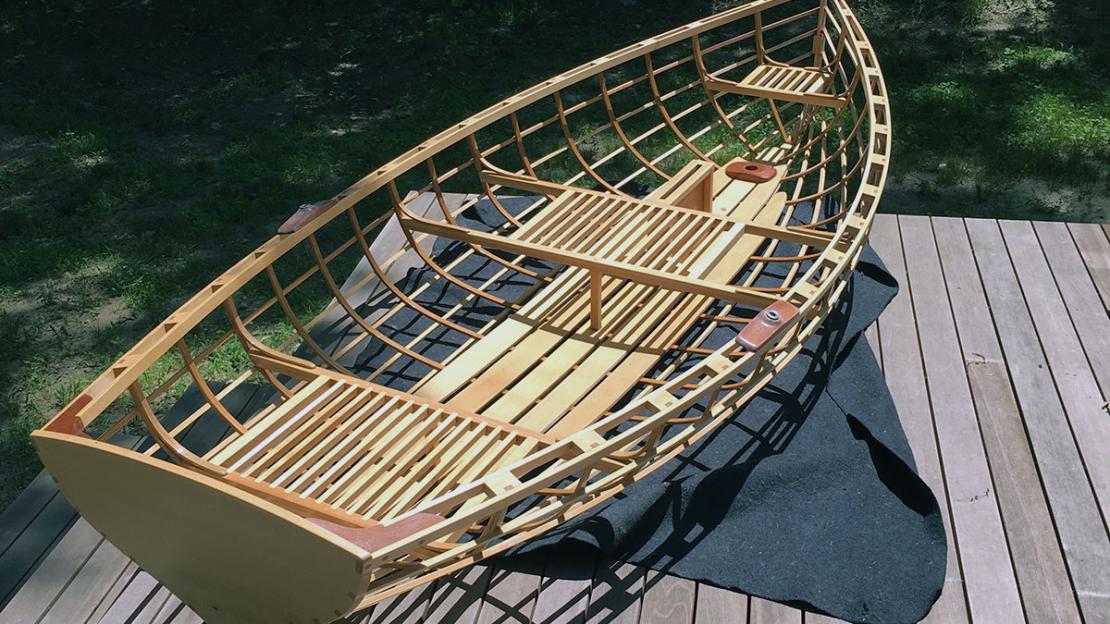
For a Platt Monfort–designed Classic 10 skin-on-frame dinghy, the author put his personal stamp on the construction details, but he did not alter the shape of the hull.

“Trust your eyes,” a boat designer once told me as I was building a wood-strip canoe to his plans. Your eyes, he said, will tell you what looks right and what doesn’t, and you should trust your instincts. At first, I found that suggestion maddening because I didn’t have the confidence that comes with experience. But as I continued to work on the canoe I found that it was perhaps the best piece of advice I had ever been given. It recently came to mind again when I decided to build another boat, this time a new dinghy for my 34′ sailboat.

I needed a dinghy because my inflatable, at 10 years old, had outlived its expected lifespan. I was tired of its cranky outboard motor, which wouldn’t always start. I had had enough of the leaky rubber pontoons and paying the hefty price of a dinghy slip every summer. I was dreaming of a pretty little rowboat, preferably one that I could hoist onto my truck rack and launch whenever I needed it. Looking around at available designs, the ones by Platt Monfort of Geodesic Airolite Boats caught my eye—especially the “Classic 10.” It’s a great-looking boat, highly regarded by its owners, extremely light at only 40 lbs, and would fit—just barely—on the foredeck of my sailboat. As I researched the design further online, I saw that people who had built them had enjoyed the process and also enjoyed the boat. So I decided to go ahead and build one.

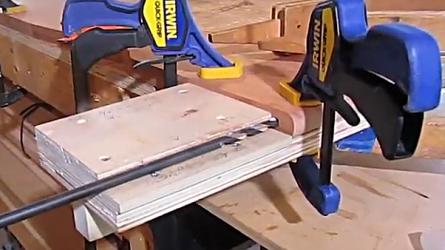
I work as a machinist, and my entire career has been in mechanical design, machine-shop work, and project management. I’ve built a lot of different things, sometimes to other people’s plans and sometimes to my own. “Trust your eyes” became invaluable advice for me in numerous ways, and I realized early on that it was going to play a big part in this project. I really liked the overall shape of the boat, but I was surprised to find that a lot of the building details were quite basic, obviously drawn with the novice builder in mind. Although they were generally in line with the angular, high-tech look of the boat, I felt that I could do some things differently and give that boat a little more aesthetic refinement and soften its hard edges a bit. I wanted to make it my own.

The plans specified marine plywood for a lot of pieces. Plywood certainly has its place, but I felt that solid wood would look much better—plus, I had lucked into a load of premium aircraft-grade Sitka spruce that a friend of mine had lying around his shop. I decided to use this clear, light wood everywhere I could, limiting my use of plywood to the rudder, centerboard, and centerboard trunk sides. I also raided a boatbuilder friend’s scrap bins, where I found a bunch of offcuts of really nice mahogany, which I used wherever the plans called for hardwood—for example, in the oarlock pads and maststep. I used air-dried white oak for the frames, and I found that the three contrasting wood colors worked really well together.

strongback and plywood station molds.

1 Like most small-boat projects, this one is built upside down, starting with a strongback and plywood station molds, which I made out of ¼″ lauan plywood. The solid-wood transom is also set up on the strongback, along with the stem and inner keel forming the boat’s permanent backbone. The plumb bob helps align everything to the strongback’s centerline. It’s wise to set everything up with great care, because this building jig determines the final shape of the boat.

The stringers—including the sheer clamp—fit into the notches.

2 Half of the plywood forms have notches in them, and the stringers—including the sheer clamp—fit into those notches and also into notches in the transom. At the stem, they’re beveled to land on the stem sides. The stringers help determine the exact bevels to shape at the transom—here, the stringers are shown notched into the transom, where they were epoxy-glued into place. Next, the frames are steam-bent to the insides of the stringers. All of the pieces are epoxy-glued together, including the frames to the stringers. After the glue has set, the structure of the hull is basically complete. The process went quickly and was fairly forgiving.

It’s time to turn the boat over and remove the plywood molds.

3 After the frames are all glued into place, it’s time to turn the boat over and remove the plywood molds. The skeletal hull is beautiful, but it lacks strength and stiffness. It’s not until the gunwales and seats go in that it begins to feel solid. And that’s when I decided to deviate from the plans and have fun with the details.

Using the milling machine.

4 I work for an electronics manufacturing company, designing and building the tooling and machinery they need in order to make their products. It’s constantly challenging and requires a lot of very precise work. I’m also allowed to use the shop in my off time, and I took advantage of that privilege a lot with this project. Primarily, I used the milling machine seen in this photo. It is something like a big drill press but has a table that can be moved back and forth precisely. Fitted with flat-ended cutters, it can be used as a big router to cut out pockets and notches. I made the entire centerboard trunk, part of which is seen here, on this machine. It was also useful in making 30 identical gunwale spacers and seat parts, and I used it to bore a hole in the middle of the mast partner at the precise angle to receive the mast.

Using the CNC machine in a couple of ways.

5 I also used the milling machine to cut flat surfaces and precise notches in the breasthook, the transom knees, and a few other pieces—all of which could have been made with chisels and saws in my basement shop, but that would have taken much longer and the result wouldn’t have been as clean and precise.

My company also has a programmable CNC milling machine, which can cut curved shapes. Some of these would be impossible to make on a regular milling machine that can only be dialed side-to-side and back-and-forth. I used the CNC machine in a couple of ways on this project.

Making all the metal fittings.

6 I used the company’s machine shop to make all the metal fittings for the boat, including the rudder gudgeons and pintles.

The bow eye and masthead fitting.

6a The bow eye which through-fastens to a corresponding metal backing plate on the inside of the stem; and a masthead fitting. But all this machining didn’t require me to trust my eyes too much. As a machinist, I’ve learned to trust the micrometer and also the digital readout on the milling machine. It’s nice to be able to switch back and forth between two ways of working.

The shaped oarlock pads.

7 The shaped oarlock pads were turned on the shop’s metal lathe, which can also be used for woodturning. I used the lathe to turn a tiller extension, the maststep, and the oarlock pads.

Med uses a vise-held spring swage to shape the head of the iron.

7a The maststep and oarlock pads both involved faceplate turnings, as shown in photo in the case of the shaped oarlock pads.

This boat requires quite a bit of hand-shaping.

8 This boat, for all of its machined parts, still required quite a bit of hand-shaping. I sometimes would start by machining a piece that had to have precision edges but then finish the work using hand tools. For example, the mast partner had to fit perfectly to the gunwales, but I used hand tools to sculpt the in-between areas to fluid shapes, totally by eye.

Tapering the quarter knees, mast, and boom.

9 I tapered the ends of the quarter knees so they followed the curve of the transom’s top edge. I also tapered the mast and the boom, instead of using closet poles as suggested in the plans. I made all of these pieces in my basement shop, often at night. I stayed up way too late a number of times watching them come to life in my hands.

All sharp edges arre removed—and then varnished.

10 The structure of skin-on-frame boats has to be completed—with all sharp edges taken off—and then varnished before the skin goes on. Installing the fabric is one of the last jobs and one of the most challenging. Right before the skin goes on, the hull is criss-crossed with Kevlar roving to add strength and stiffness and support the cloth between the stringers. The cloth is placed over hot-melt adhesive tape. Those elements of construction were beyond my realm of experience entirely, so I’m very glad that Larry LaLonde, the owner of Geodesic Airolite Boats, has created a YouTube channel with helpful how-to videos (https://www.youtube.com/channel/UC_RdzjWwXg06-1Q3eXETj4g/videos).

Sheathing the boat.

10a Sheathing the boat was still stressful and terrifying. It’s a two-person job, and I got through it with help. At the transom, the cloth extends onto the aft face to cover the end-grain of the stringers, as shown in the photo. After the skin installation is completed, the fabric needs at least three coats of varnish, then the outer keel and rubrails can be installed to complete the hull.

A Tyvek sail for the boat.

11 I made a Tyvek sail for the boat, which I haven’t sailed much, mainly because I haven’t had as much leisure to go noodling around the harbor under sail as I had hoped. I’ll get to that, though.

The boat weighs only 40 lbs.

12 The boat, weighing only 40 lbs without the sailing rig, is easy to hoist by myself onto my truck rack. It’s also easy to hoist aboard my 34-footer when necessary, and it stows on the foredeck. Light weight also makes the boat a pleasure to row, and it is very responsive to the oars. I gained most of my previous rowing experience when the outboard motor of my inflatable wasn’t working, and rowing that boat was very different from getting into a good rowing rhythm with a boat that’s designed for oar power.

Thrilled with this boat.

13 I’ve been thrilled with the boat, which gets a lot of attention everywhere I take it. Building it has honed my abilities to shape things by hand with confidence in my aesthetic decisions. It was a great experience. Article ends

Steve McMahon lives in Sag Harbor, New York. He sails MOONGLOW, his Vineyard Vixen 34, there and in the waters of southern New England. Contact him at stevemc725@gmail.com.

For more information, see Geodesic Airolite Boats, 1327 Bud Davis Rd., Newnan, GA 30263; 678–850–7876; www.gaboats.com.